Maya
Publish Plugins
Render Settings Validator
ValidateRenderSettings
Render Settings Validator is here to make sure artists will submit renders we correct settings. Some of these settings are needed by OpenPype but some can be defined by TD using OpenPype Settings UI.
OpenPype enforced settings include:
- animation must be enabled in output
- render prefix must start with
maya/<scene>to make sure renders are in correct directory - there must be
<renderlayer>or its equivalent in different renderers in file prefix - if multiple cameras are to be rendered,
<camera>token must be in file prefix
For Vray:
- AOV separator must be set to
_(underscore)
For Redshift:
- all AOVs must follow
<BeautyPath>/<BeautyFile>_<RenderPass>image file prefix - AOV image format must be same as the one set in Output settings
For Renderman:
- both image and directory prefixes must comply to
<layer>_<aov>.<f4>.<ext>and<ws>/renders/maya/<scene>/<layer>respectively
For Arnold:
- there shouldn't be
<renderpass>token when merge AOVs option is turned on
Additional check can be added via Settings - Project Settings > Maya > Publish plugin > ValidateRenderSettings. You can add as many options as you want for every supported renderer. In first field put node type and attribute and in the second required value.
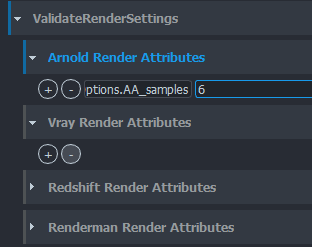
In this example we've put aiOptions.AA_samples in first one and 6 to second to enforce
Arnolds Camera (AA) samples to 6.
Note that aiOptions is not the name of node but rather its type. For renderers there is usually
just one instance of this node type but if that is not so, validator will go through all its
instances and check the value there. Node type for VRay settings is VRaySettingsNode, for Renderman
it is rmanGlobals, for Redshift it is RedshiftOptions.
Model Name Validator
ValidateRenderSettings
This validator can enforce specific names for model members. It will check them against Validation Regex. There is special group in that regex - shader. If present, it will take that part of the name as shader name and it will compare it with list of shaders defined either in file name specified in Material File or from database file that is per project and can be directly edited from Maya's OpenPype Tools > Edit Shader name definitions when Use database shader name definitions is on. This list defines simply as one shader name per line.

For example - you are using default regex (.*)_(\d)*_(?P<shader>.*)_(GEO) and you have two shaders defined
in either file or database foo and bar.
Object named SomeCube_0001_foo_GEO will pass but SomeCube_GEO will not and SomeCube_001_xxx_GEO will not too.
Top level group name
There is a validation for top level group name too. You can specify whatever regex you'd like to use. Default will
pass everything with _GRP suffix. You can use named capturing groups to validate against specific data. If you
put (?P<asset>.*) it will try to match everything captured in that group against current asset name. Likewise you can
use it for subset and project - (?P<subset>.*) and (?P<project>.*).
Example
You are working on asset (shot) 0030_OGC_0190. You have this regex in Top level group name:
.*?_(?P<asset>.*)_GRP
When you publish your model with top group named like foo_GRP it will fail. But with foo_0030_OGC_0190_GRP it will pass.
About regex
All regexes used here are in Python variant.
Maya > Deadline submitter
This plugin provides connection between Maya and Deadline. It is using Deadline Webservice to submit jobs to farm.
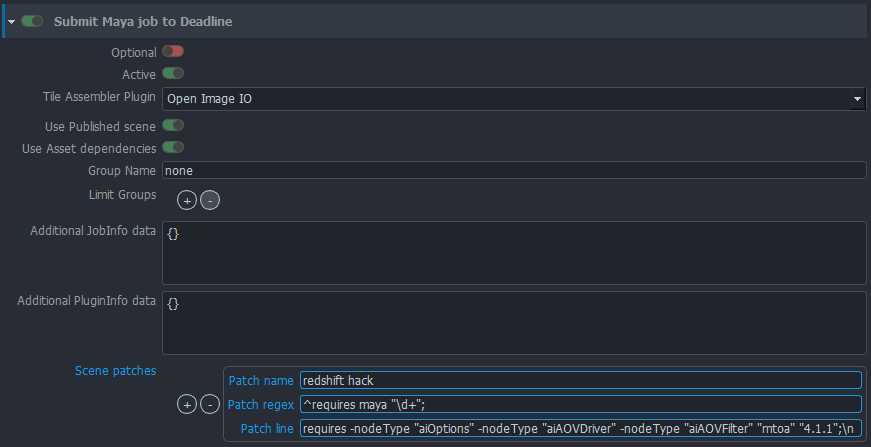
You can set various aspects of scene submission to farm with per-project settings in Setting UI.
- Optional will mark sumission plugin optional
- Active will enable/disable plugin
- Tile Assembler Plugin will set what should be used to assemble tiles on Deadline. Either Open Image IO will be used or Deadlines Draft Tile Assembler.
- Use Published scene enable to render from published scene instead of scene in work area. Rendering from published files is much safer.
- Use Asset dependencies will mark job pending on farm until asset dependencies are fulfilled - for example Deadline will wait for scene file to be synced to cloud, etc.
- Group name use specific Deadline group for the job.
- Limit Groups use these Deadline Limit groups for the job.
- Additional
JobInfodata JSON of additional Deadline options that will be embedded inJobInfopart of the submission data. - Additional
PluginInfodata JSON of additional Deadline options that will be embedded inPluginInfopart of the submission data. - Scene patches - configure mechanism to add additional lines to published Maya Ascii scene files before they are used for rendering.
This is useful to fix some specific renderer glitches and advanced hacking of Maya Scene files.
Patch nameis label for patch for easier orientation.Patch regexis regex used to find line in file, afterPatch linestring is inserted. Note that you need to add line ending.
Custom Menu
You can add your custom tools menu into Maya by extending definitions in Maya -> Scripts Menu Definition.
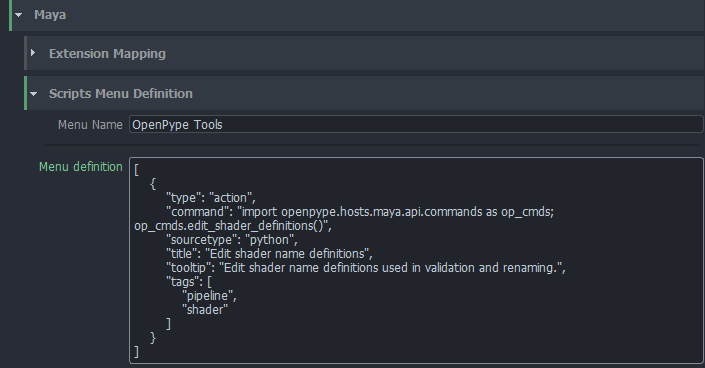
Work in progress
This is still work in progress. Menu definition will be handled more friendly with widgets and not raw json.
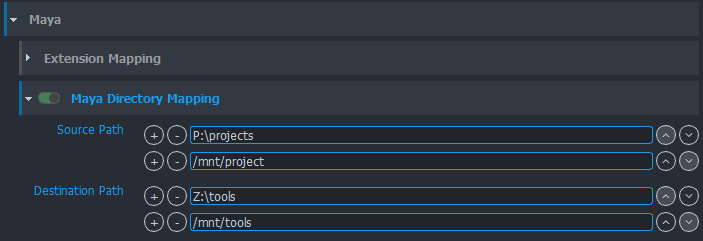
Multiplatform path mapping
You can configure path mapping using Maya dirmap command. This will add bi-directional mapping between
list of paths specified in Settings. You can find it in Settings -> Project Settings -> Maya -> Maya Directory Mapping
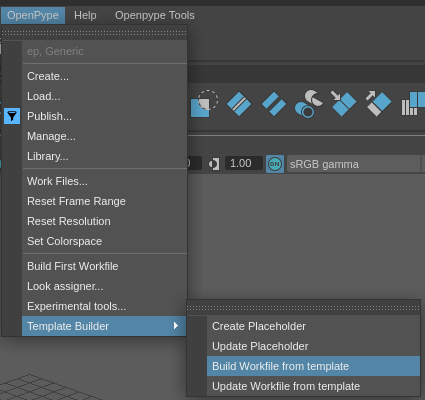
Templated Build Workfile
Building a workfile using a template designed by users. Helping to assert homogeneous subsets hierarchy and imports. Template stored as file easy to define, change and customize for production needs.
1. Make a template
Make your template. Add families and everything needed for your tasks. Here is an example template for the modeling task using a placeholder to import a gauge.

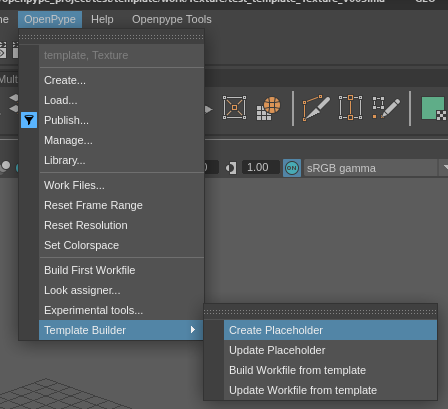
If needed, you can add placeholders when the template needs to load some assets. OpenPype > Template Builder > Create Placeholder
- Configure placeholders
Fill in the necessary fields (the optional fields are regex filters)
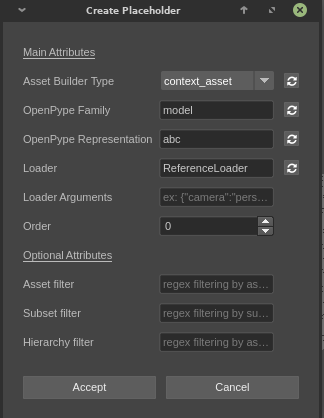
- Builder type: Wether the the placeholder should load current asset representations or linked assets representations

- Representation: Representation that will be loaded (ex: ma, abc, png, etc...)

- Family: Family of the representation to load (main, look, image, etc ...)

- Loader: Placeholder loader name that will be used to load corresponding representations

- Order: Priority for current placeholder loader (priority is lowest first, highet last)
- Save your template
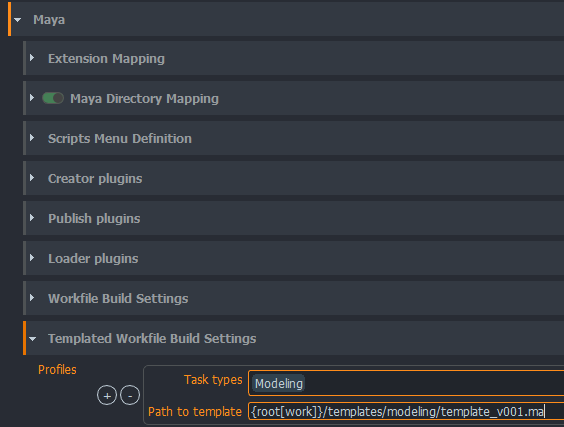
2. Configure Template
- Go to Studio settings > Project > Your DCC > Templated Build Settings
- Add a profile for your task and enter path to your template
3. Build your workfile
Open maya
Build your workfile