Yeti for Maya
Working with Yeti in OpenPype
OpenPype can work with Yeti in two data modes. It can handle Yeti caches and Yeti rigs.
Creating and publishing Yeti caches
Let start by creating simple Yeti setup, just one object and Yeti node. Open new empty scene in Maya and create sphere. Then select sphere and go Yeti → Create Yeti Node on Mesh Open Yeti node graph Yeti → Open Graph Editor and create setup like this:
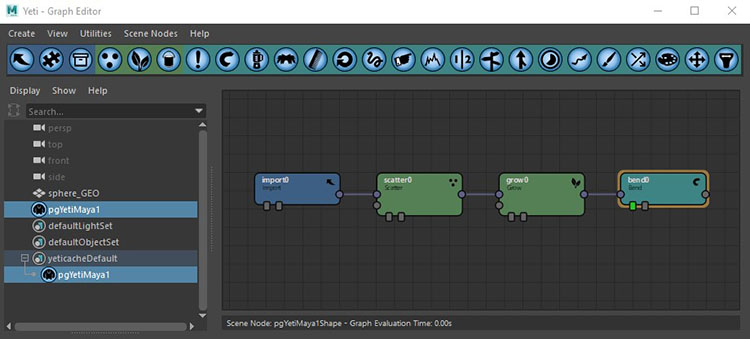
It doesn't matter what setting you use now, just select proper shape in first
Import node. Select your Yeti node and create Yeti Cache instance - OpenPype → Create...
and select Yeti Cache. Leave Use selection checked. You should end up with this setup:
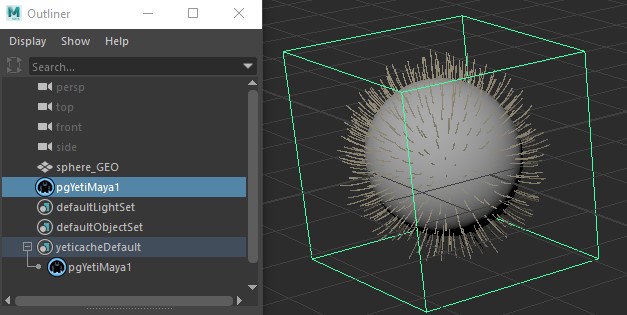
You can see there is yeticacheDefault set. Instead of Default it could be named with
whatever name you've entered in subset field during instance creation.
We are almost ready for publishing cache. You can check basic settings by selecting Yeti cache set and opening Extra attributes in Maya Attribute Editor.
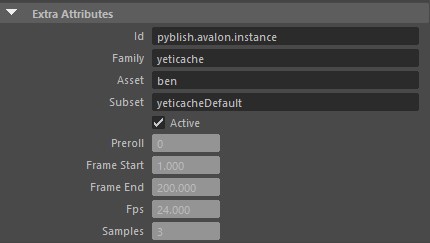
Those attributes there are self-explanatory, but:
Prerollis number of frames simulation will run before cache frames are stored. This is useful to "steady" simulation for example.Frame Startfrom what frame we start to store cache filesFrame Endto what frame we are storing cache filesFpsof cacheSampleshow many time samples we take during caching
You can now publish Yeti cache as any other types. OpenPype → Publish. It will
create sequence of .fur files and .fursettings metadata file with Yeti node
setting.
Loading Yeti caches
You can load Yeti cache by OpenPype → Load .... Select your cache, right+click on it and select Load Yeti cache. This will create Yeti node in scene and set its cache path to point to your published cache files. Note that this Yeti node will be named with same name as the one you've used to publish cache. Also notice that when you open graph on this Yeti node, all nodes are as they were in publishing node.
Creating and publishing Yeti Rig
Yeti Rigs are working in similar way as caches, but are more complex and they deal with other data used by Yeti, like geometry and textures.
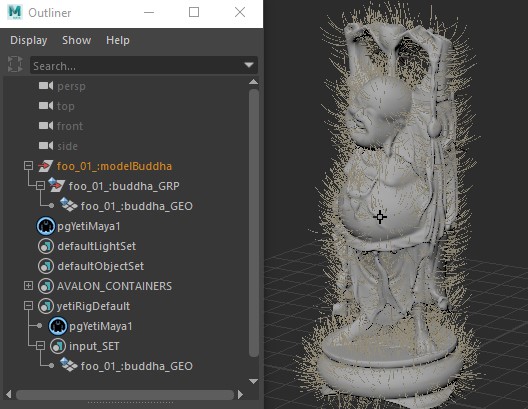
Let's start by loading into new scene some model. I've loaded my Buddha model.
Create select model mesh, create Yeti node - Yeti → Create Yeti Node on Mesh and setup similar Yeti graph as in cache example above.
Then select this Yeti node (mine is called with default name pgYetiMaya1) and
create Yeti Rig instance - OpenPype → Create... and select Yeti Cache.
Leave Use selection checked.
Last step is to add our model geometry to rig instance, so middle+drag its
geometry to input_SET under yetiRigDefault set representing rig instance.
Note that its name can differ and is based on your subset name.
Save your scene and ready for publishing our new simple Yeti Rig!
Go to publish OpenPype → Publish and run. This will publish rig with its geometry
as .ma scene, save Yeti node settings and export one frame of Yeti cache from
the beginning of your timeline. It will also collect all textures used in Yeti
node, copy them to publish folder resource directory and set Image search path
of published node to this location.
Collect Yeti Cache failure
If you encounter Collect Yeti Cache failure during collecting phase, and the error is like
No object matches name: pgYetiMaya1Shape.cbId
then it is probably caused by scene not being saved before publishing.
Loading Yeti Rig
You can load published Yeti Rigs as any other thing in OpenPype - OpenPype → Load ..., select you Yeti rig and right+click on it. In context menu you should see Load Yeti Cache and Load Yeti Rig items (among others). First one will load that one frame cache. The other one will load whole rig.
Notice that although we put only geometry into input_SET, whole hierarchy was
pulled inside also. This allows you to store complex scene element along Yeti
node.
auto-connecting rig mesh to existing one
If you select some objects before loading rig it will try to find shapes
under selected hierarchies and match them with shapes loaded with rig (published
under input_SET). This mechanism uses cbId attribute on those shapes.
If match is found shapes are connected using their outMesh and outMesh. Thus you can easily connect existing animation to loaded rig.